How to Change the VPS Root/Admin Password in Virtualizor

You can change the root/admin password of your VPS operating system using Virtualizor.

1. Log in to your Virtualizor Control Panel.

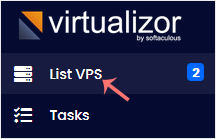
2. From the left side panel, click on List VPS.

3. Hover your mouse on the appropriate VPS, and that line will be highlighted. Then click on the Manage icon in the highlighted line.

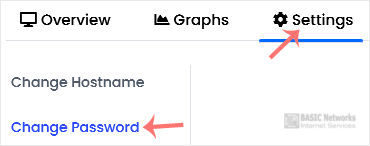
4. Click Settings and then choose Change Password.

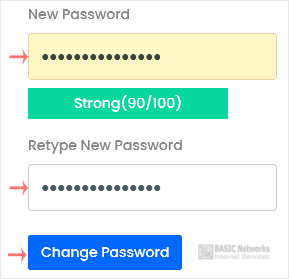
5. Enter your new password, and confirm with Change Password.

6. On the top right side, choose Poweroff.

7. Finally, click on Start.

It may take a few minutes for the VPS to start. You can then access it with your new password.

  • 0 Users Found This Useful
Was this answer helpful?

Related Articles

How to Enable Disable APIC, ACPI, VNC in Virtualizor

Virtualizor allows you to enable or disable VNC, APIC, and ACPI. 1. Log in to your...

How to Change Hostname in Virtualizor

You can change the hostname in Virtualizor. 1. Log in to your Virtualizor Control Panel....

How to Change the VNC Password in Virtualizor

You can change the VNC password using Virtualizor. 1. Log in to your Virtualizor Control...

How to Edit the Self-Shutdown Timer in Virtualizor

You can easily edit the self-shutdown timer in Virtualizor. Please, follow the steps below to...

How to Delete the Self-Shutdown Timer in Virtualizor

You can remove the self-shutdown timer in Virtualizor. Please, follow the steps below to...